neues Rezept 🙂
2 Bleche, 500g Mehle
– Buchweizenmehl 180g
– Reisvolkornmehl 180g
– Maisstärke 100g
– Braunhirsemehl 40g
– Wasser 360ml
– 1Tüte Weinstein-Backpulver
– eine Gute Priese gemahlene Flohsamenschalen (Pulver)
Umluft 190°C
auf unterster Schiene 15-20min
Category: Uncategorized
funny plastic material…
did you know there is a plasict material that melts at about 60°C ?
the official name / main ingredient is
Polycaprolacton (PCL) (wikipedia: de en)
product names i found:
- Polymorph
- InstaMorph
- Plaast Kunststoff (de shop) (i used this one)
- Gorilla Plastic (link:wayback)
the challeng is to get a good water bath in the right temperature.
so for this i reused my HotPlate SMD soldering hardware.
created a profile that just heats to 60°C and waits…
i will add some pictures and experiment results here in some days 😉
Arduino Light-Barrier with TSOP4438
you just want to build a Light-Barrier (DE: Lichtschranke) ?
for example to measure speed? Or Count goals on a Table-Top-Football?
then you are at the right place.
We use a TSOP4438 as Receiver and some 5mm IR-LED as Sender.
the code
IR_TSOP4438_light_barrier_withDebounce/ir_light_barrier.ino
// based on
// Example of modulating a 38 KHz carrier frequency at 500 Hz with a variable duty cycle
// Author: Nick Gammon
// Date: 24 September 2012
// https://forum.arduino.cc/t/how-to-create-a-38-khz-pulse-with-arduino-using-timer-or-pwm/100217/44

// tweaked for TSOP4438
// https://www.vishay.com/docs/82459/tsop48.pdf
// find max burst length and min gap times:
//
// Minimum burst length 10 cycles/burst
// After each burst of length 10 to 40 cycles
//  a minimum gap time is required of ≥ 10 cycles
// Maximum number of continuous short bursts/second: 1500
//
// translates to:
// 38kHz = 26,3 us / Pulse → *10= 263us
// max burst length: <= 1052us  (26,3*40)
// min gap   length: >=  263us  (26,3*10)
// total cycle time of (1052+263=) 1315us
// that violates the max bursts/second (666us/burst)
//
// on option is to optimize for the most bursts/second:
// so we use the min gap time as given and use the rest of the available time.
// 666us - 263us = 403 us burst length
// hopefully this way the AGC does not filter our stream...
// we now have to fit this to the best available prescaler / counter values:
// 672us fits good (this way we have less than the 1500 burst)
// this translates to 42 counts a' (0,0625us*256=) 16us
// so we use a gap length of 16us*17 = 272us
// this gives us a burst length of 16us*(42-17)= 400us
//
// second option is to optimize for the longest burst length and have less bursts/second.
// here we will use a in-between leaning towards longer bursts:
// 0,0625us*256=16us
// 16us*50counts =  800us = 0,80ms = 1250,00Hz = 1250bursts/s
// 16us*80counts = 1280us = 1,28ms =  781,25Hz = 781,25bursts/s
// gap   length: 16us*17      =  272us
// burst length: 16us*(80-17) = 1008us

// http://www.gammon.com.au/forum/?id=11504
// Timer 1
//   OC1A: D9
//   OC1B: D10
const byte LED = 9;

// Timer 2 (8bit)
//   OC2A: D11
//   OC2B: D3


// Clock frequency divided by 38 kHz frequency desired
const long timer1_OCR1A_Setting = F_CPU / 38000L;
// (16000000 / 38000) = 421,05
// this only works on Timer 1 - as it is a 16bit timer.

// ------------------------------------------
// in-between -  leaning for longer bursts
// target counts:
// CPU          16MHz (0,0625us)
// prescaler    256
// target       781kHz (1280us = 1,28ms)
const long timer2_top = (F_CPU / 256L) / 781L;
// (16000000 / 256) / 781 = 80
// calculate on / off ratio (toggle point)
const long timer2_compare = timer2_top * 1008L / 1280L;
// 80 * 1008 / 1280   =  80 - 17  =  63


volatile bool sender_active = false;

ISR (TIMER2_COMPA_vect) {
    // used to combine the two timers...
    if (sender_active == false) {
        // enable timer1 output
        TCCR1A |= bit(COM1A0) ;  // Toggle OC1A on Compare Match
        // digitalWrite (LED_BUILTIN, HIGH);
        sender_active = true;
    } else {
        sender_active = false;
        // disable timer1 output
        TCCR1A &= ~bit(COM1A0) ;  // DO NOT Toggle OC1A on Compare Match
        digitalWrite (LED, LOW);  // ensure off
        // digitalWrite (LED_BUILTIN, LOW);
    }
}

void lightBarrierSender_setup() {
    pinMode(LED, OUTPUT);
    digitalWrite(LED, LOW);
    pinMode(LED_BUILTIN, OUTPUT);
    digitalWrite(LED_BUILTIN, LOW);

    // set up Timer 1 - gives us 38.095 KHz
    TCCR1A = bit (COM1A0); // toggle OC1A on compare
    TCCR1B = _BV(WGM12) | _BV (CS10);   // CTC to OCR1A, No prescaler
    OCR1A =  (16000000L / 38000L / 2) - 1;  // zero relative

    // setup Timer 2
    TCCR2A = 0;
    TCCR2B = 0;
    // toggle OC2A on compare
    // TCCR2A |= bit(COM2A0);
    // fast pwm to OCR2A
    TCCR2A |= bit(WGM21) | bit(WGM20);
    TCCR2B |= bit(WGM22);
    // prescaler 1024
    // TCCR2B |= bit(CS22) | bit(CS21) | bit(CS20);
    // prescaler 265
    TCCR2B |= bit(CS22) | bit(CS21);
    // top
    OCR2A = timer2_top - 1;  // zero relative
    // switch point
    OCR2B = timer2_compare - 1;  // zero relative
    // enable interrupts
    TIMSK2 = bit(OCIE2A);
    // TIMSK2 = bit(OCIE2B) | bit(OCIE2A);
}
/IR_TSOP4438_light_barrier_withDebounce/IR_TSOP4438_light_barrier_withDebounce.ino
// simple light barrier test


unsigned long debounceDuration = 10;

const byte beam1Pin = 2;
bool beam1State = LOW;
bool beam1StateLast = LOW;
unsigned long beam1Timestamp = 0;

const byte beam2Pin = 3;
bool beam2State = LOW;
bool beam2StateLast = LOW;
unsigned long beam2Timestamp = 0;


void setup(){
    Serial.begin(115200);
    Serial.println("IR_TSOP4438_light_barrier");
    Serial.println("setup...");

    pinMode(beam1Pin, INPUT);
    pinMode(beam2Pin, INPUT);

    lightBarrierSender_setup();

    Serial.println("running.");
}

void loop() {
    beam1_check();
    beam2_check();
}


void beam1_check() {
    bool beam1Current = digitalRead(beam1Pin);

    if(beam1Current != beam1StateLast) {
        beam1Timestamp = millis();
    }

    if ((millis() - beam1Timestamp) > debounceDuration) {
        // egal welcher wert - dieser ist länger als debounceDuration da!

        // check for state change
        if(beam1Current != beam1State) {
            beam1State = beam1Current;
            if(beam1State) {
                Serial.println("beam1 brock...");
            }
        }
    }

    beam1StateLast = beam1Current;
}

void beam2_check() {
    bool beam2Current = digitalRead(beam2Pin);

    if(beam2Current != beam2StateLast) {
        beam2Timestamp = millis();
    }

    if ((millis() - beam2Timestamp) > debounceDuration) {
        // egal welcher wert - dieser ist länger als debounceDuration da!

        // check for state change
        if(beam2Current != beam2State) {
            beam2State = beam2Current;
            if(beam2State) {
                Serial.println("beam2 brock...");
            }
        }
    }

    beam2StateLast = beam2Current;
}
or just download this arduino sketchbook:
deep dive into the details
To get the TSOP4438 to work we need to send a 38kHz Modulated Signal from the LED. the catch: the receiver is designed to ignore CONTINUOUS signals – that is the way to also reject all the Disturbance from surrounding things like Fluorescent Lamps or other things…
therefore we need to modulate again the 38kHz signal:
so that there are times the signal is send and breaks where the beam is off. The timing requirements for this Pattern are described in the Datasheet :
Minimum burst length 10 cycles/burst

After each burst of length 10 to 40 cycles
a minimum gap time is required of ≥ 10 cycles

For bursts greater than  40 cycles
a minimum gap time in the data stream is needed of  > 10 x burst length

Maximum number of continuous short bursts/second 1500
To Be continued…
Research:
- https://www.vishay.com/docs/82459/tsop48.pdf#page=6&zoom=250,-155,381
- https://forum.arduino.cc/t/how-to-create-a-38-khz-pulse-with-arduino-using-timer-or-pwm/100217/12
- https://forum.arduino.cc/t/how-to-create-a-38-khz-pulse-with-arduino-using-timer-or-pwm/100217/64
- http://www.gammon.com.au/forum/?id=11504&reply=6#reply6
- http://www.gammon.com.au/forum/bbshowpost.php?id=11504&page=2
- http://www.gammon.com.au/images/Arduino/Timer_2.png
- http://www.gammon.com.au/images/Arduino/Timer_1.png
- https://arduino.stackexchange.com/questions/31187/irremote-send-and-receive-same-arduino
- http://www.righto.com/2010/03/detecting-ir-beam-break-with-arduino-ir.html?showComment=1447463463512#c570784324410264988
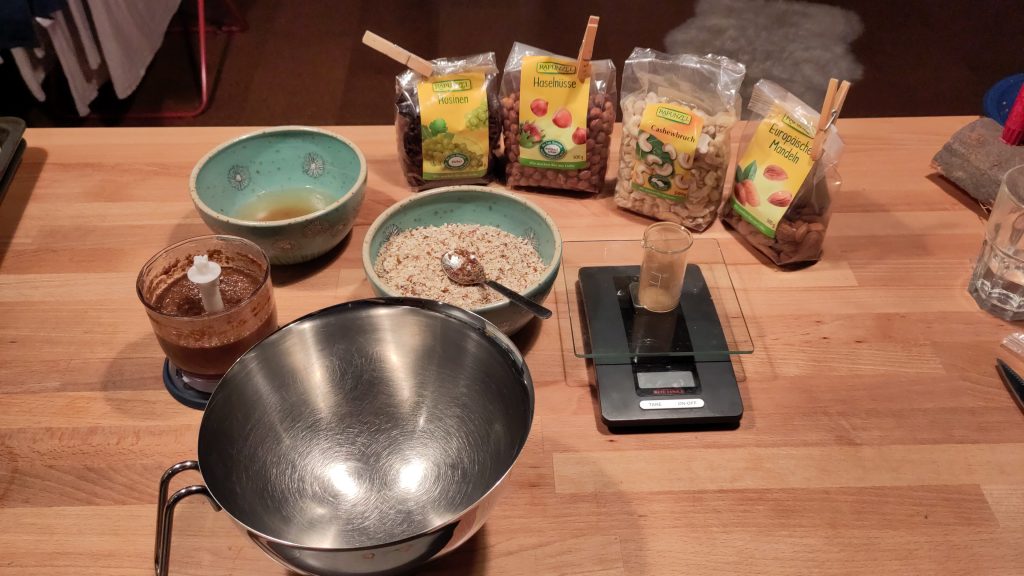
Vegane Elisenlebkuchen / Nusstaler
Diesmal war die Challenge *Basische* Leckereien für mich zu Zaubern.
es geht in Richtung Elisenlebkuchen – ich würde es eher als Nusstaler benennen.

Zutaten
die meisten Zutaten habe ich von Rapunzel verwendet.
Zutaten
- 50g Datteln
- 90g Rosinen
- 120g Haselnüsse
- 140g Mandeln
- 60g Cachewkerne
- ca 7g Lebkuchengewürz
- ca 4g Ceylon Zimt
- ein bisschen geriebene und getrocknete Orangenschale
- eine Halbe Zitrone (inkl. Schale!!)
- einen kleinen Schluck Wasser
Zubereitumg
- Datteln kleiner schneiden
- Dateln & Rosinen mit sehr heisem Wasser einweichen
- Nüsse alle zussammen mischen
- hälfte davon in kleinen portionen mit einem Hexler sehr fein mahlen
- zweite hälfte gröber hexeln
- zur Seite stellen
- Datteln & Rosinen Gewürze & die (zerteilte) Zitrone mit einem kleinen Teil des Einweich-Wassers sehr fein Hexeln
- dies gibt eine feine creme
- diese creme mit der Nussmischung verrühren / kneten
- wenn gleichmäßig verknettet für mehrere Stunden Kühl-Stellen
- Ofen Vorheizen: Umluft 140°C
- dann den Teig in kleine Haufen aufteilen
- diese dann zwischen den Handflächen rollen – dadurch entstehen Kugeln die eine glatte Oberfläche haben
- jeweils die Kugel mit dem Handballen flachdrücken (ca 1cm Höhe)
- dann ab in den Backofen (140°C Umluft) – ca 15-20min – leichte bräune = fertig 🙂
- kurz auskühlen lassen
Frisch schmecken sie mir am besten 🙂
ich finde sie sehr gelungen – das nächste mal etwas mehr zitrone und mehr Zimt –
das macht es Frischer und Würziger.. (das Lebkuchengewürz hatte eine starke Nelke-Note..)
Das Konzept des Zweiteiligen Hexelns wie ich es mir beim letzten mal ausgemahlt habe ist aufgegangen.
Gerne wieder 🙂
MPS Dortmund 2019 :-)
schön war es!

das Bild oben ist ein Panorama vom Fredenbaumpark-see 🙂
war eine wirklich schöne entspannte zeit –
konnte auch ein bisschen den Hüter des Lichts erzählen lassen – und hab viel positives Feedback dafür bekommen 😉
und nettte Menschen kennen gelernt 🙂
freu mich schon auf den nächsten Markt/Spektakulum/Festival – was auch immer es sein wird 😉
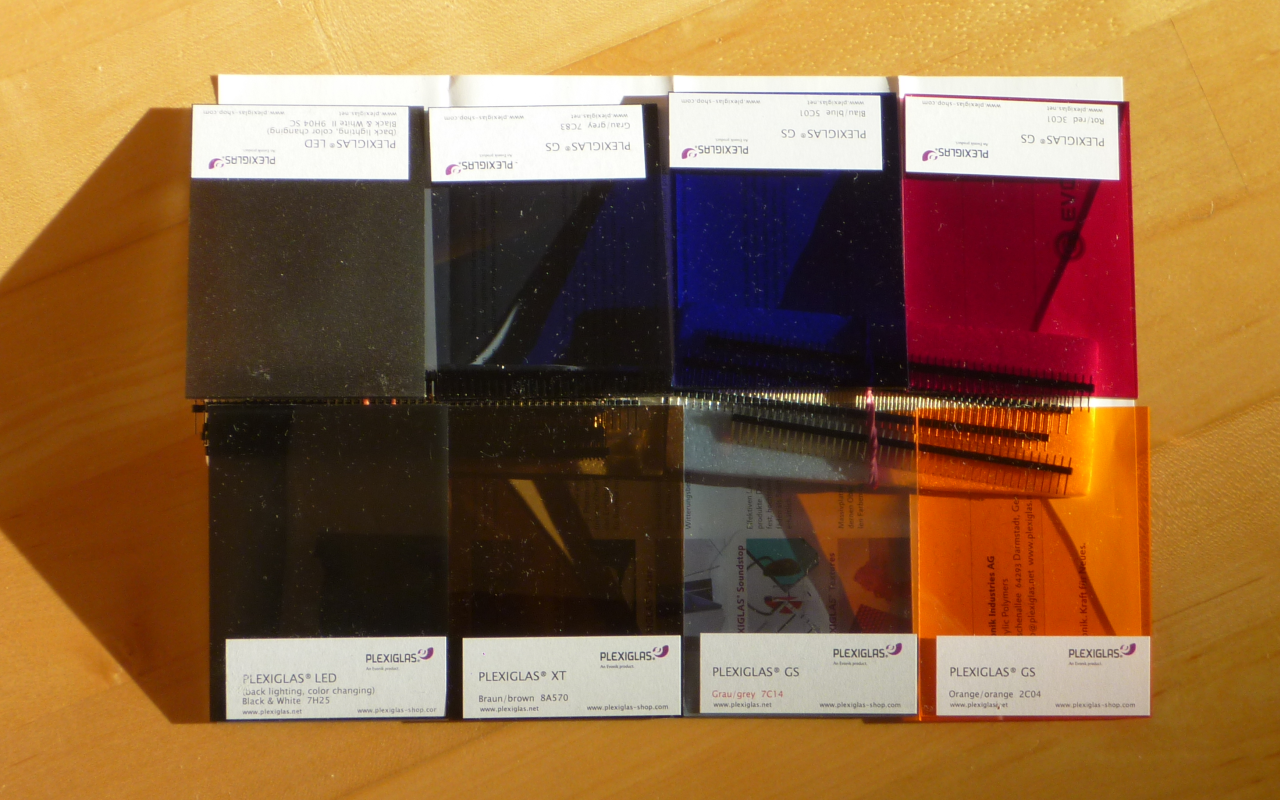
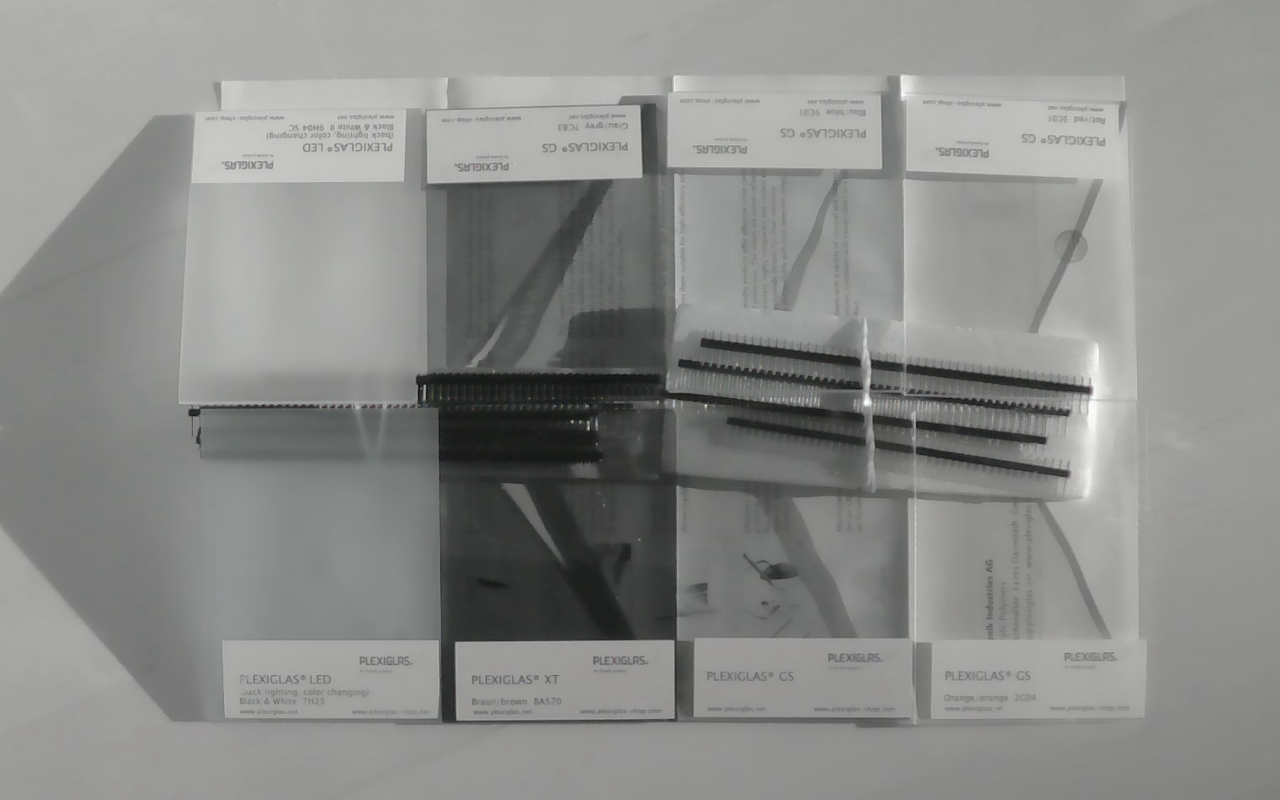
acrylic glass & infrared light


Is colorful Acrylic glass transparent to Infrared Light?
hover over the image above to find out 🙂
